
1)Firstly, the colour mode was changed to CMYK and then the yellow channel was copied and pasted whilst also inverting the layer. Next, the mode was then changed to RGB and the layer was changed to soft light.
2) The background layer was copied and then used the spot healing tool to cover any blemishes or 'imperfections'. Following this, all layers were converted to smart object.
3) This layer was copied and 'gaussian blur' was selected, the scale was moved until the skin was no longer visible but the eyes were still able to be seen.
4) Again, the original layer was copied, altering the scales this time so that skin details were clearer. It was then changed to linear light.
5) All of the layers were grouped and then a layer mask was inserted, using the paint brush tool to apply the airbrush effect.
6) Remaining layers merged, using the dodge and burn tool to contour- adding more definition to Nova's face.
7) After the skin was completely airbrushed, details were added to the rest of the features on her face to make the overall look look complete. This included filling in her eyebrows to cancel out any sparse areas, using the hue & saturation tool in order to brighten up her eyes and her lips.
8) We used the clone tool to erase the stray piece of hair that was slightly sticking out of Nova's head. We did this as our teacher commented that it looked oddly placed/stood out. We took this constructive criticism on board, especially as it was coming from an outside viewer therefore their opinion was valued more than anything because this was something not even we had noticed. We then made the image black and white, adjusting the levels to make it stand out in the right places, grabbing the audience's attention even further.
The editing was successful because it meant that Nova had a 'perfect' looking appearance which fit great for the front of a CD. It meant that the photo looks like even more of a professional quality which is exactly what we were aiming for in order for it to be taken seriously by the audience.
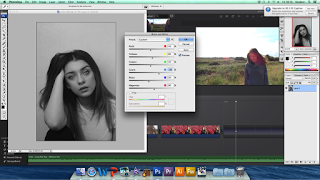
The image above shows the photograph being made black and white. Our reasoning behind this was because we were planning to have a colourful background and therefore didn't want the main picture on the front cover to clash at all- this meant that converting the image to black and white would avoid all of these issues however still have a strong contrast and stand out.

The layer has been duplicated as we wanted to put it onto a grey background. We did this by cropping the original image to a square and then duplicating the layer onto a new photoshop document. Light grey was our chosen colour as we had initially trialed a white background however we deemed it unsuccessful because of how unnaturally bright it appeared. We had to make the background slightly darker in order for the photograph to look like it actually belonged. It was a good idea as the colours in the background will still be able to pop whilst complimenting the black and white photograph.

Next, we inserted the font on the album cover. We all discussed how large these titles should be and whereabouts they should be placed, eventually agreeing that they were best suited at the top centre, with Nova being larger than the album name 'Fragments'. The reasoning behind this is due to the fact that it seemed more important for the artist's name to be advertised than the album, so that at a later date an audience member will be more likely to remember Nova which seemed more important- I think this was a good decision. Our reasoning for our chosen title is explained in this post. We used a font called 'Basic Title Font' for the title 'Fragments' as it was minimalistic (as we planned a busy background so didn't want it to appear to packed) and looked like a similar version of the artist's logo- therefore creating continuity and making the album look complete as a whole. (We selected these fonts from dafont.com). We used black font, again, as it matched the rest of our digipak and had a professional appearance about it which is what we strive for.


This is our final outcome for the front cover of our album. We are all very pleased with the outcome as it looks of a professional standard whilst also showing continuity across the rest of our auxiliary products/music video. This means that all of our projects look as one which is extremely important because that audience is able to link the album, say, to the video, meaning that we have successfully remained consistent.
If we were to carry out this task again, one of the things we could do differently is make the tessellation more vibrant in order for it to stand out further and possibly catch the audience's attention more quickly. Saying this, we are happy with how bright the colours already currently are as our aim was always to make them more muted to keep the more mature, laid back appearance.
No comments:
Post a Comment